
How to Screenshot on a PC Laptop: HP, Dell, Lenovo, ASUS

Learning how to take a screenshot on a PC laptop is a skill that's not only incredibly useful but also easy to master. In this comprehensive guide, we'll break down the steps for you, covering popular brands like HP, Dell, Lenovo, and ASUS. Whether you're a complete beginner or just looking to refresh your memory, you'll find actionable tips that you can use right away to capture your screen like a pro.
How to Take a Screenshot on an HP Laptop
If you own an HP laptop, you might be wondering how to take a screenshot on a PC laptop. The process is straightforward.
HP laptops generally run on Windows, making the screenshot process similar to other Windows-based laptops.
Method 1: The simplest way is to use the "PrtScn" button.
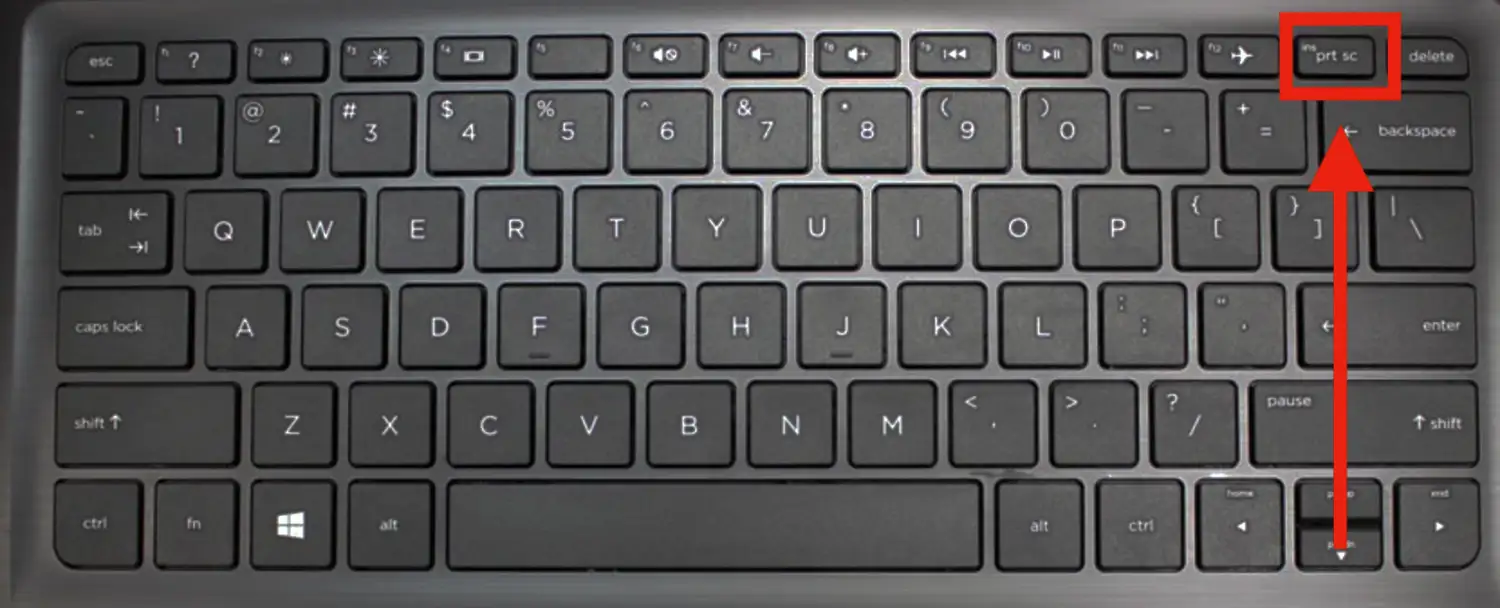
Pressing "PrtScn" captures the entire screen and copies it to the clipboard.
You can then paste this into an application like Paint or Word.
Method 2: If you want to capture only the active window, use "Alt + PrtScn".
This will capture only the window that is currently active, saving you the time of cropping the image later.
After capturing, open Paint and press "Ctrl + V" to paste the screenshot.
Save the image in your desired format and location.
- Tip: You can also use the Snipping Tool for more customized screenshots.
How to Take a Screenshot on a Lenovo Laptop
Lenovo laptops also run on Windows, so the steps for how to take a screenshot on a PC laptop are similar.
Lenovo offers some additional screenshot options through its Vantage software.
Method 1: The standard way is to use the "PrtScn" button.
Press it to capture the entire screen.
Open Paint and paste the screenshot by pressing "Ctrl + V".
Method 2: Use "Alt + PrtScn" to capture only the active window.
Open Paint, paste the screenshot, and save it.
Lenovo Vantage offers additional screenshot options, such as timed screenshots.
Check the Vantage software for these features.
- Tip: You can also use the Snipping Tool for more customized screenshots.
How to Take a Screenshot on an ASUS Laptop
If you're using an ASUS laptop, you'll find that the process for how to take a screenshot on a PC laptop is quite standard.
ASUS laptops typically run on Windows, so you can use the native screenshot methods.
Method 1: Press the "PrtScn" button to capture the entire screen.
Open Paint and paste the screenshot by pressing "Ctrl + V".
Method 2: Use "Alt + PrtScn" to capture only the active window.
Open Paint, paste the screenshot, and save it.
ASUS also offers additional screenshot options through its software.
Check the ASUS software for these features.
Save the image in your preferred format.
- Tip: You can also use the Snipping Tool for more customized screenshots.
How to Take a Screenshot on a Dell Laptop
For those using a Dell laptop, the process of how to take a screenshot on a PC laptop is quite similar to other brands.
Dell laptops usually come with Windows pre-installed.
Therefore, you can use the native screenshot methods available in the Windows operating system.
Method 1: Press the "PrtScn" button to capture the entire screen.
Open an image editor like Paint, and paste the screenshot by pressing "Ctrl + V".
Method 2: For capturing a specific window, use "Alt + PrtScn".
This captures only the active window.
Again, open Paint and paste the screenshot.
Save the image in your preferred format.
For more advanced options, you can use third-party software.
- Tip: Windows also offers a Snipping Tool for more screenshot options.
How to Take a Screenshot on Windows 7
Windows 7, although older, still has options for how to take a screenshot on a PC laptop.
The most straightforward method is using the "PrtScn" button.
Press it to capture the entire screen.
Open Paint and paste the screenshot by pressing "Ctrl + V".
Save the image in your preferred format.
You can also use the Snipping Tool, which comes pre-installed on Windows 7.
Open the Snipping Tool, select the area you want to capture, and save the screenshot.
For more advanced options, third-party software is available.
- Tip: Some keyboards may require you to press "Fn + PrtScn" instead.
How to Take a Screenshot on Windows 10
Windows 10 offers multiple ways for how to take a screenshot on a PC laptop.
The simplest method is using the "PrtScn" button.
Press it to capture the entire screen.
Open Paint and paste the screenshot by pressing "Ctrl + V".
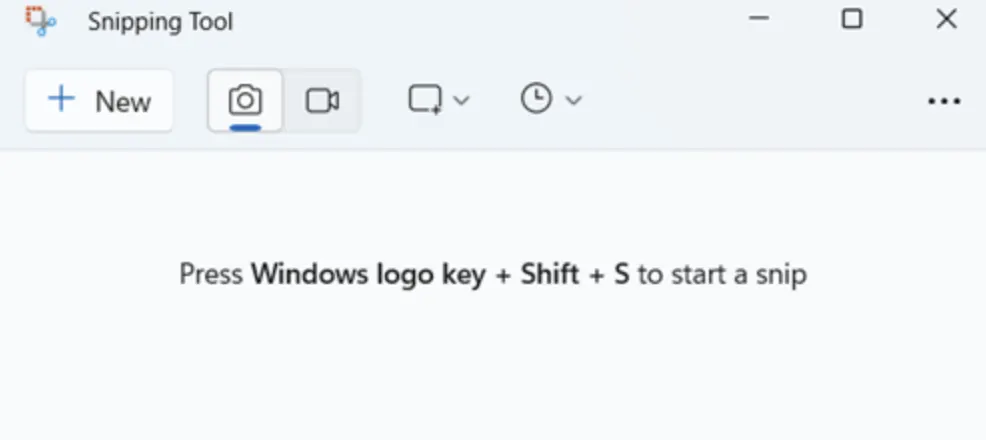
Method 2: Use "Windows + Shift + S" to open the Snip & Sketch tool.
Select the area you want to capture and it will be copied to the clipboard.
Open Paint, paste the screenshot, and save it.
Windows 10 also offers a Snipping Tool for more screenshot options.
- Tip: Use "Windows + Print Screen" to save the screenshot directly as a file.
How to Take a Screenshot on Windows 11
Windows 11, the latest OS, offers new ways for how to take a screenshot on a PC laptop.
The "PrtScn" button still works for capturing the entire screen.
Press it and the screenshot will be copied to the clipboard.
Open Paint and paste the screenshot by pressing "Ctrl + V".
Save the image in your preferred format.
Windows 11 also introduces new screenshot options in the Snip & Sketch tool.
Press "Windows + Shift + S" to open it.
Select the area you want to capture and it will be copied to the clipboard.
Open Paint, paste the screenshot, and save it.
- Tip: Use "Windows + Print Screen" to save the screenshot directly as a file.
Keyboard Shortcuts for Screenshots
Keyboard shortcuts are a quick and efficient way for how to take a screenshot on a PC laptop.
The most common is the "PrtScn" button, which captures the entire screen.
"Alt + PrtScn" captures only the active window.
"Windows + Shift + S" opens the Snip & Sketch tool for custom screenshots.
"Windows + Print Screen" saves the screenshot directly as a file.
These shortcuts work across different Windows versions.
They offer a quick way to capture information without needing to open additional software.
Remember to paste the screenshot into an image editor like Paint to save it.
- Tip: Some keyboards may require you to press "Fn + PrtScn" instead.
Snipping Tools
Snipping tools offer more flexibility for how to take a screenshot on a PC laptop.
Windows 10 and 11 comes with a built-in Snipping Tool, as well as the newer Snip & Sketch.
Both allow you to capture custom areas of the screen.
Open the tool and select the area you want to capture.
The screenshot will be copied to the clipboard.
Open Paint, paste the screenshot, and save it.
These tools also offer options like timed screenshots and different shapes for capturing.
They are a more advanced option for those who need more than basic screenshots.
- Tip: Snip & Sketch also allows you to annotate the screenshot before saving it.
FAQ
How do you capture a screenshot on a PC?
Capturing a screenshot on a PC is a simple process that can be done in multiple ways. The most common method is to use the "PrtScn" button on your keyboard.
Pressing this button will capture the entire screen and copy it to your clipboard. You can then paste it into an image editor like Paint to save it.
For those wondering how to take a screenshot on a PC laptop, this method works across various brands like HP, Dell, Lenovo, and ASUS.
How do you take a screenshot on Windows keyboard?
Taking a screenshot using a Windows keyboard is straightforward. The key you'll most often use is the "PrtScn" button.
Pressing "PrtScn" captures the entire screen, while "Alt + PrtScn" captures only the active window. These screenshots are copied to your clipboard and can be pasted into an application like Paint.
Another option is to use "Windows + Shift + S" to open the Snip & Sketch tool, allowing you to select a specific area of the screen to capture.
How to take a screenshot on Chrome?
Taking a screenshot on Chrome can be done in several ways. The simplest is to use the "PrtScn" button on your keyboard, which works across all applications, including Chrome.
For capturing just the visible part of a webpage, you can use "Alt + PrtScn". If you need to capture a full webpage, Chrome offers built-in developer tools for this purpose.
Alternatively, you can use Chrome extensions like "Lightshot" or "Awesome Screenshot" for more advanced screenshot features.
How do I take a screenshot on Windows without Print Screen?
If your keyboard doesn't have a "PrtScn" button, or you're looking for alternative methods, Windows offers other ways to take a screenshot.
You can use the Snipping Tool or Snip & Sketch, which are built-in apps that allow you to capture custom areas of the screen.
Another option is to use the "Windows + Shift + S" shortcut to open the Snip & Sketch tool for capturing a specific area.
Third-party screenshot software like "Snagit" also provide robust screenshot capabilities.
What is the PrtScn button?
The "PrtScn" button, short for "Print Screen," is a keyboard key commonly used for taking screenshots on Windows PCs.
Pressing this button captures the entire screen and copies it to the clipboard. From there, you can paste it into an image editor like Paint to save it.
The "PrtScn" button may also be used in combination with other keys like "Alt" or "Windows" to capture specific areas or types of screenshots.
Read more

3 Best HP Laptops in 2023

3 Best Lenovo Laptops in 2023

3 Best ASUS Laptops in 2023

The 8 Best Webhosting Services for Digital Nomads in 2023

Digital Nomad Calculator